
This website uses cookies to ensure you get the best experience on our website. Learn more
Setting Up Active Directory: Step-by-Step Guide for a Successful Implementation
Table of Contents

Last updated on April 30, 2026
Active Directory (AD) is the default directory service included in Windows operating systems. It’s the backbone of on-premises Windows network infrastructure, delivering efficient, centralized identity and access management.
When a user signs into a domain-joined device, AD verifies their identity, typically using Kerberos, to confirm they are who they claim to be. Once authenticated, it checks group memberships and policies to determine what that user is allowed to access and what controls should be put in place. This includes Windows client device controls and user policies like password policies.
Because AD sits at the center of identity security, a misconfigured deployment can quickly become a security risk. For that reason, getting the initial setup right matters. This guide walks administrators through how to set up AD step-by-step, with a focus on building a secure and manageable environment from day one.
How to set up Active Directory in Windows Server
Step 1: Set up the OS and assign a name and IP address
Start by installing the operating system on your server. Make sure to apply all updates and place the server on a private network.
Next, assign the server name via the system properties and a static IP address, subnet, and gateway via the network adapter settings. This ensures the server is up to date and uniquely identified, enables connectivity, and prevents conflicts or confusion on the network.
Set the Preferred Domain Name Service (DNS) to use the loopback address 127.0.0.1 to point the server at itself. If this is not the first domain controller (DC), specify the IP address of an existing DC in the alternate DNS server settings.
Make sure you create a strong initial administrator password as this will be the first domain admin account. It’s important to secure this account, using measures like a very long password with more than 15 characters. Do not delete the account as it will be vital should you need to recover your AD in the future. It’s the only account that can login when AD cannot be started.
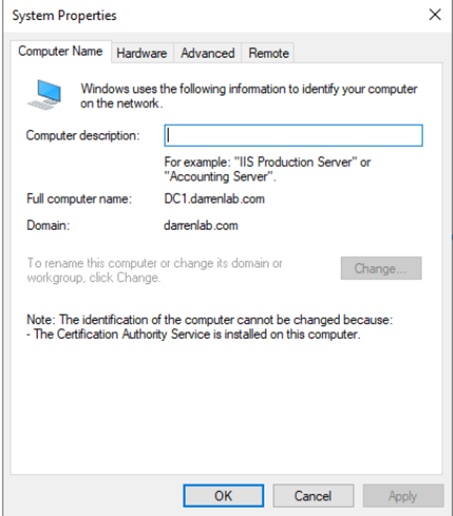
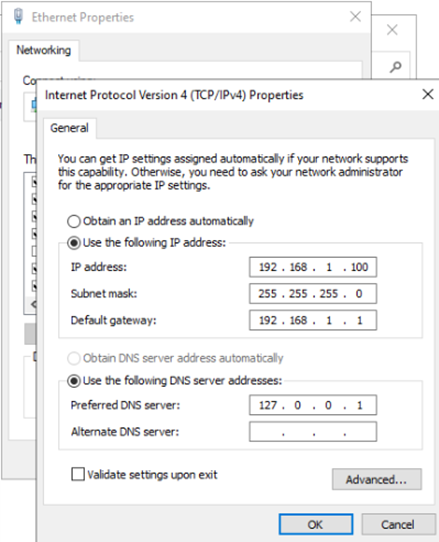
The screens you’ll see when assigning the name and IP address
Step 2: Install and configure DNS for Active Directory
The first planned DCr requires the DNS role, which you can install through the Server Manager. DNS translates server names into IP addresses, enabling smooth network communication.
Step 3: Set reverse lookup and server DNS suffix
Create a reverse lookup zone to translate IP addresses back into hostnames, which improves name resolution, and makes network communication faster and more secure.
Step 4: Verify DNS settings
Before installing AD, ensure all DNS settings are correct using the nslookup command. This guarantees that the DC communicates properly with other devices.
Note: If this is a fresh AD install, steps 2 – 4 are all done when you add the AD Domain Services role.
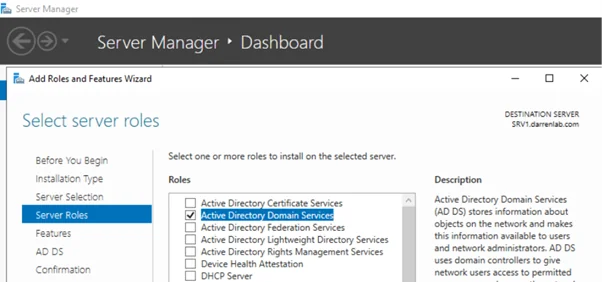
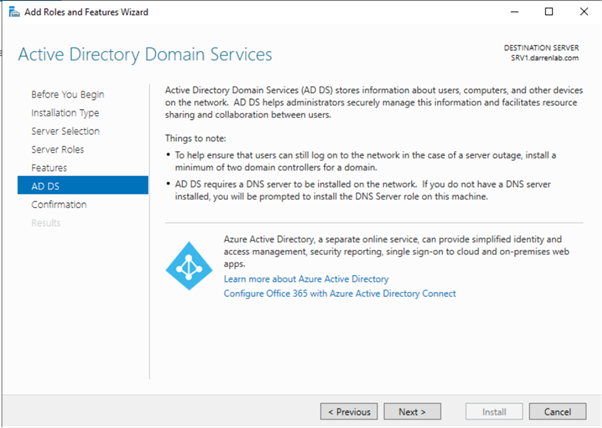
Step 5: Install Active Directory domain services role
You can install AD binaries and admin tools via Server Manager or PowerShell. This role is essential for running AD on your server.
Setting up AD Domain Services
Step 6: Begin active directory installation
Once the server role is installed, start configuring AD via Server Manager. Assign the DNS name for your domain, which must match the DNS zone to ensure domain members communicate correctly. You will be asked if you want to create a new forest, a new domain in an existing forest or add an additional domain controller to an existing domain.
Step 7: Configure DNS properly
After entering the Directory Service Recovery account, enable DNS delegation so AD data is properly consolidated. Correct delegation ensures requests are routed to the appropriate Domain Controller efficiently.
Step 8: Complete configuration
Set the NetBIOS name, database and log file locations, and folders for Netlogon and SYSVOL shares. These settings are critical for storing and distributing AD data correctly.
Step 9: Integrate DNS into Active Directory and configure secure updates
Integrate DNS zones into AD to distribute DNS data efficiently via DNS Manager. This simplifies and improves network name resolution. Secure dynamic DNS updates should be enabled if possible, but some non-domain joined clients are unable to support this mode.
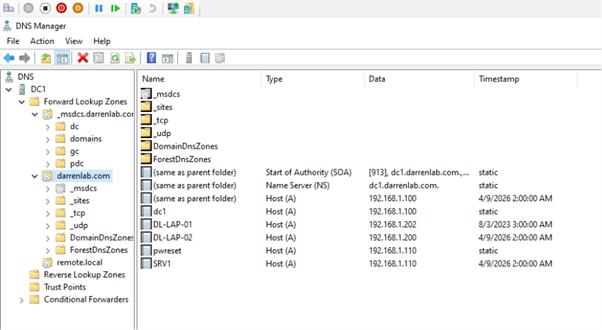
The DNS Manager
Step 10: Set DNS replication
Once integrated, configure how DNS data replicates across to other domains e.g. other trusted domains or forests. Proper replication ensures all Domain Controllers maintain up to date, consistent DNS records.
Step 11: Adjust DNS IP settings
After AD installation, verify that server IP settings point to the correct DNS server. Check and update IP addresses as needed in network settings.
Step 12: Perform follow-up work after integrating additional DCs
If adding extra DCs, ensure they replicate and synchronize correctly. Tools like repadmin or dcdiag help verify status and troubleshoot issues. Use the Windows Event Logs, particularly the Directory Service and Distributed File System (DFS) Replication logs to check for information and errors.
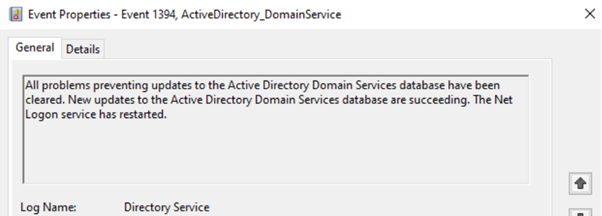
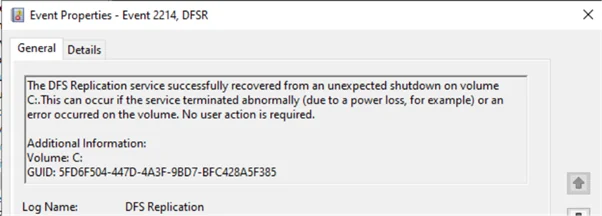
Using Windows Event Logs to check for errors
Step 13: Test and troubleshoot Active Directory DCs
After the AD installation and configuration, DCs should be tested regularly to ensure they are fully functional. Tools like dcdiag can be used to run comprehensive checks and identify potential issues.
If your tools detect any errors, you should address them immediately to ensure the AD environment operates smoothly and reliably. Regular testing helps maintain a stable network and prevents disruptions caused by misconfigured or unsynchronized DCs.
Step 14: Configure the Time in Active Directory
Time plays a critical role in AD, especially for Kerberos authentication. It’ is essential that all DCs are synchronized and have the correct time. Use the Windows Time Service (w32time) to ensure synchronization with a reliable time server.


6 Active Directory setup best practices
1. Design an OU structure that works for your business
Organizational Units (OU) are containers that contain all user and computer objects that are managed by your AD. There is no right way to structure it, but there are many wrong ways. Think about how your organization works today, but also think about how it might change in the future.
Consider splitting your users into OU’s that define their roles, the department they work in, and their physical location. Also consider the type of computers and how you might want to apply different policies to each type, such as servers, laptops, workstations, and virtual machines, and what departments they belong to and their physical locations.
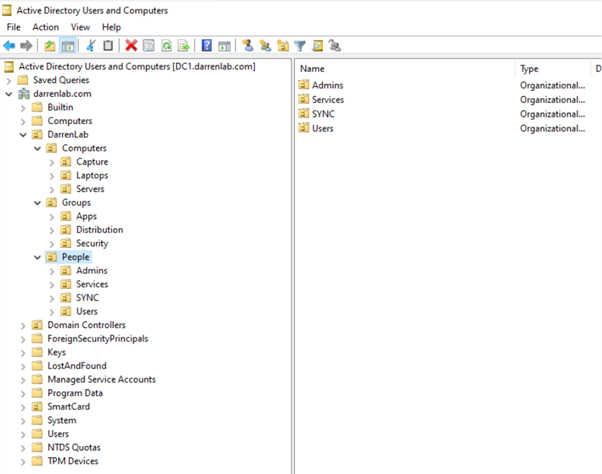
Organizing users in AD
2. Follow the principle of least privilege
Users and administrators should only have the permissions required to perform their roles. Typically, this involves separating administrative accounts from standard user accounts.
For example, administrators can use a normal account for everyday tasks and a separate privileged account for administrative work. Limiting privileges reduces the impact if credentials are compromised and helps prevent accidental changes to critical systems.
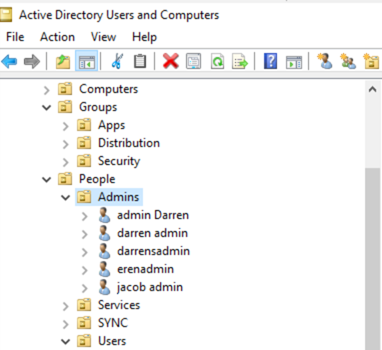
Administrator accounts in AD
3. Use security groups to manage permissions
Managing permissions at the user level quickly becomes difficult to maintain. Instead, assign permissions to security groups and assign users to groups based on their role or responsibilities. AD user attributes help you categorize users.
This approach simplifies administration and makes auditing much easier. If someone changes roles or leaves the organization, you can simply update their group membership rather than tracking down individual permissions across multiple systems. Use consistent naming conventions, and provide descriptions.
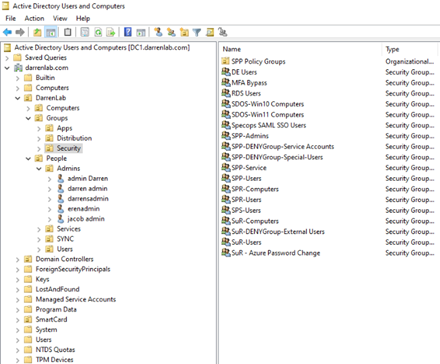
Security groups in AD
4. Design Group Policy carefully
Group Policy Objects (GPOs) allows administrators to enforce security settings, configure systems, and standardize environments across every machine.
However, poorly designed GPOs can cause conflicts or make troubleshooting difficult. Try to keep policies as simple as is feasible, and keep them organized. Regularly reviewing settings ensures that GPOs remain aligned with current security policies. Again, use consistent naming conventions, and provide descriptions.
5. Secure your DCs
DCs hold some of the most sensitive data in your environment, including password hashes and authentication services. Because of this, they should be treated as high-value assets.
Best practices include:
- Limiting who can log in to DC accounts.
- Patching regularly and keeping your DC OS’s up to date and with Microsoft’s support.
- Restricting external network access where possible. Do your DC’s need to talk to the internet? Probably not.
- Monitoring for suspicious authentication activity.
- Backing up your AD – and testing that the backup works!
6. Document your environment
Finally, document your AD design as you build it. Record details such as domain structure, organizational unit hierarchy, administrative roles, and key policies. Good documentation helps new administrators understand how the environment is structured and makes troubleshooting much easier when issues arise.
Secure your Active Directory with Specops
It’s easy for AD issues to go unnoticed without regular audits. Our free read-only tool Specops Password Auditor scans your AD for user and password-related vulnerabilities. The tool identifies weak or compromised passwords by checking an express list of over 1 billion credentials, as well as highlighting stale or inactive privileged accounts. You can review all findings in a complimentary, easy-to-understand interactive report.
Specops Password Policy then simplifies the ongoing management of password policies across your AD environment. Readymade templates and auditor-ready reports ensure you meet compliance standards, while dynamic feedback helps your users create strong, memorable passwords.
The Breached Password Protection feature continuously scans your AD against a database of over 5.8 billion unique compromised passwords, with customizable alerts if breaches are identified.
Interested in seeing how Specops can help secure your AD? Contact us today or book a demo to see our solutions in action.
Last updated on April 30, 2026