
How to automatically pre-stage unknown computers
I got an email from a customer asking if it’s somehow possible to install new computers without Pre-Staging them first.
There is an interesting problem with a scenario like that.
How do you distinguish between Unknown Clients that you want to install, and Unknown Clients that you don’t want to be installed, for example consultants or guest laptops who connect their computers to your network, or eventually your servers that does not have a GUID in your Active Directory.
I’ve created a solution below where unknown clients will automatically be pre-staged. Though, before we get into that please consider how you want to restrict this feature.
As I see it, you have three choices where all are related to defining that you have a special (sub)network where you place your new clients on. And the rest of the network will not be affected by this solution. All of the below solutions require that you use more than one Deployment Server, one for the normal clients and one for your Automatically Pre-Stage clients.
Consider using one or more “reinstall rooms/stations” where you have a couple of network ports that either use:
- A DHCP Scopes with DHCP Options, where you control that if a client is connecting from your reinstall room, it will get an IP from a special Scope and be redirected to your Automated Deployment Server.
- Define your IP-Helpers to forward DHCP/PXE Requests from your special network to your Automated Deployment Server.
- Put your Automated Deployment Server on the SubNet where you install your clients, so the PXE broadcast request will be picked up by that Server AND block all PXE requests from being forwarded to the Automated Deployment Server from all other networks.
I did consider adding an extra step to my script. Where it verified if you have got an IP from a specific scope and if yes, then pre-stage it. That would make it possible to use just one Deployment server for the whole solution. If you would like to implement it, use the MAC Address from the Event and query the DHCP server for reservations from your Scope and if any client has that MAC Address then pre-stage it.
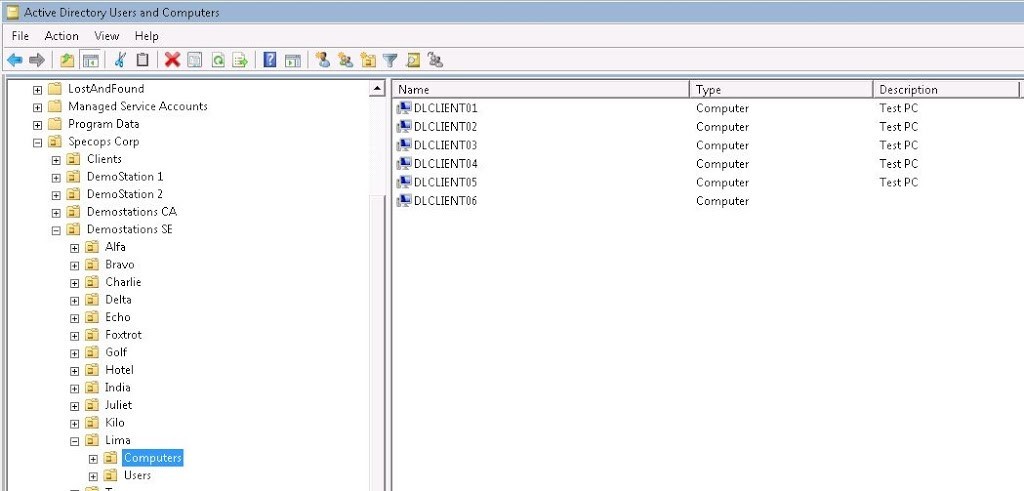
Just six client computers
Though, that’s not currently part of the script. Let me know if you would prefer that behavior.
Also, a possible minor problem is that all unknown clients will be pre-staged/installed into one specific OU. Which you might have to implement into your routines or adjust your AD and GPO design a little.
If you have a complicated Naming standard which uses the computers serial tag, or is based on location of the PC etc, that will obviously not work in this case.
At the time of PXE Boot, we don’t know the computers serial number, or where it will be located, so all you can do is use a Name+Incremental Number.
NOTE: Read the above section one more time from the very top of the page, and verify that you have configured it correctly or there is a huge risk that you will reinstall a lot of servers and clients by accident.
NOTE 2: Well, the rest is on your own risk. You were warned 😉
Pre-Requisites:
Specops Deploy / OS Admin Tools (Version 4.6! required)
PowerGUI + Quest Active Directory Module
Scripts extracted to C:TempAutoPrestage
This is all done on your Specops Deploy server.
First of all, download and extract the scripts to c:tempautoprestage.
Then open Task Scheduler and import a new task with the help of Application_sdpxeflt_101.xml file. It will create a Task that executes when a 101 Event is logged by sdpxeflt, which means that the server picked up a PXE Request from a Unknown client.
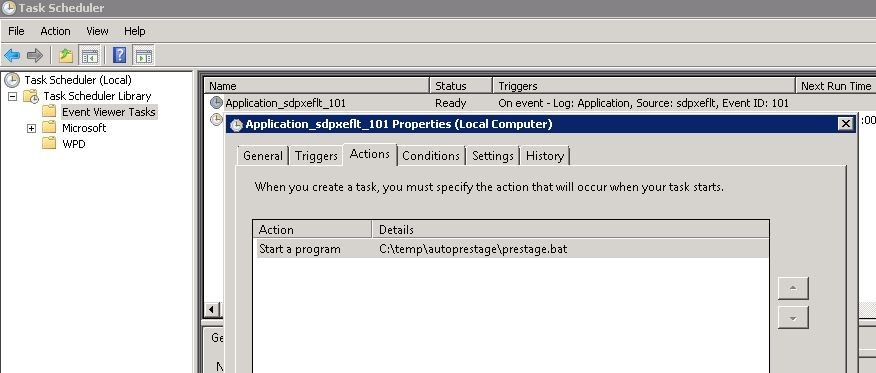
Task Scheduler, executing task on EventID 101
Make the Task execute whether a user is logged in or not, with a account that has the permission to pre-stage computer accounts.
The Task will execute c:tempautoprestagePrestage.bat that picks up the latest 101 Event from the EventLog, and writes the GUID of that computer to c:tempGUID.TXT
The script will then execute the powershell script prestage.ps1.
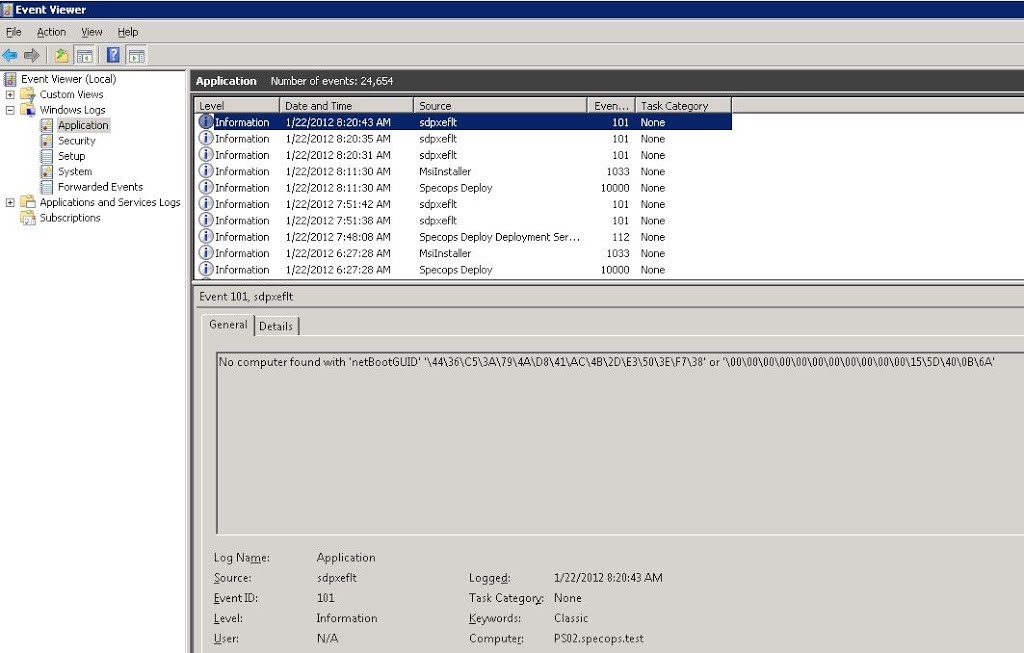
Event logged for unknown client
And after the powershell scipt has been run, clean up the temporary files.
@Echo off

wevtutil qe Application /c:1 /rd:True /q:*[System[EventID=101]] /f:Text | findstr netBootGUID > c:tempunk1.txt
for /F "tokens=4-24 delims='" %%a in (C:TEMPunk1.txt) do @echo %%a%%b%%c%%d-%%e%%f-%%g%%h-%%i%%j-%%k%%l%%m%%n%%o%%p > C:tempGUID.TXT

powershell.exe -PSConsoleFile "C:tempautoprestageprestage.psc1" -Command " & 'C:tempautoprestageprestage.ps1' " -NoProfile -Noninteractive

del /Q c:tempunk1.txt
del /Q c:tempGUID.TXT

#End of script
Prestage.ps1 is searching the AD for the first available computer name according to the pre-defined name standard in the script file. You will need to modify some lines in the script, especially if you want to use more than 00-99 as incremental number. You may want to use 0000-9999 if you have a lot of computers.
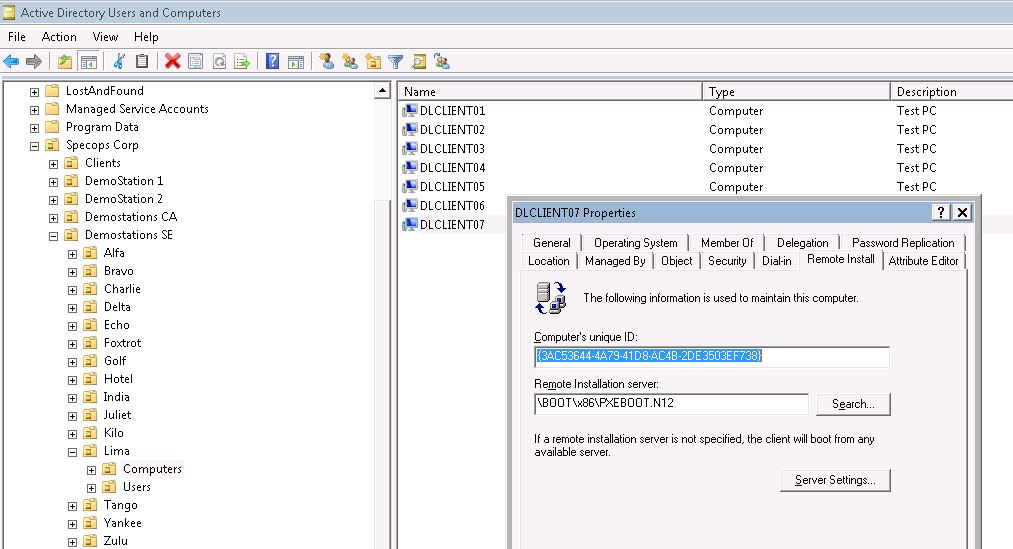
Automatically Pre-Staged client
Prestage.ps1 will then also pre-stage the unknown computer with the GUID from Prestage.bat
You will need to modify the script to suit your environment. See comments inside the scriptfile on how to modify the domain name, and your naming syntax. You may also want to increase the incremental number. I’m using just 00-99 but you probably want to make that 000-999 or 0000-9999.
# Source for Funciton Get-NextName : http://powershellcommunity.org/Forums/tabid/54/aft/4870/Default.aspx
# PowerGUI Quest ActiveDirectory Module is needed - http://powergui.org/index.jspa
# Specops Deploy Powershell Module is needed.

Import-Module SpecopsDeploy

# Need to set the correct Domain and OU to search for existing computer accounts below.
function Get-NextName([string]$nameconvention,[string]$domain='specops.test/Specops Corp'){
    $prev = 0
    $names = Get-QADComputer -LdapFilter "(name=*$nameconvention*)" -SearchRoot $domain |
# If you want to use more than two incremental numbers, increase number 2 below to a 3 or 4
   where{[string]$_.name.trim() -match "d{2}Z"} | %{$_.name}

# If you want to use more than two incremental numbers, increase number 2 below to a 3 or 4 (both possitions)
 $namenums = $names | ?{$_ -match "$nameconventiond"} | %{[int]([string]$_.trim().substring($_.length - 2,2))} | sort
    foreach($num in $namenums){
        if(($num - 1) -gt $prev){
            $newnum = $prev + 1
# If you want to use more than two incremental numbers, add more zeroes below, for example 0:000 or 0:0000
   return "$nameconvention{0:00}" -f $newnum
        }else{
            $prev = $num
        }
    }
# If you want to use more than two incremental numbers, add more zeroes below, for example 0:000 or 0:0000
return "$nameconvention{0:00}" -f ($prev+1)
}

# Change the below Naming Syntax.
$PreStageName = Get-NextName DLCLIENT
$GUID = Get-Content c:tempguid.txt

Write-Host PreStaging Computer: $PreStageName with GUID: $GUID

# Change the LDAP Path below to where the computer accounts will be created.
Add-SDPrestagedComputer -Name "$PreStageName" -Id "$GUID" -LdapPath "LDAP://OU=Computers,OU=Lima,OU=Demostations SE,OU=Specops Corp,DC=specops,DC=test"


#End of script
Done! Your previously unknown client should now be a known client and it should automatically PXE Boot and install Windows according to your normal Specops Deploy settings.
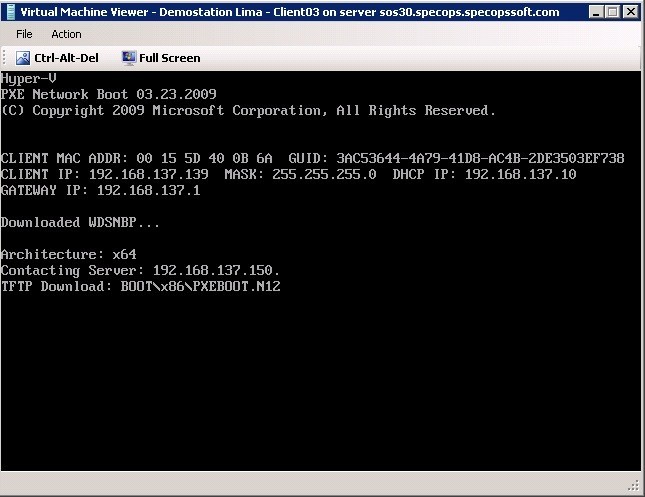
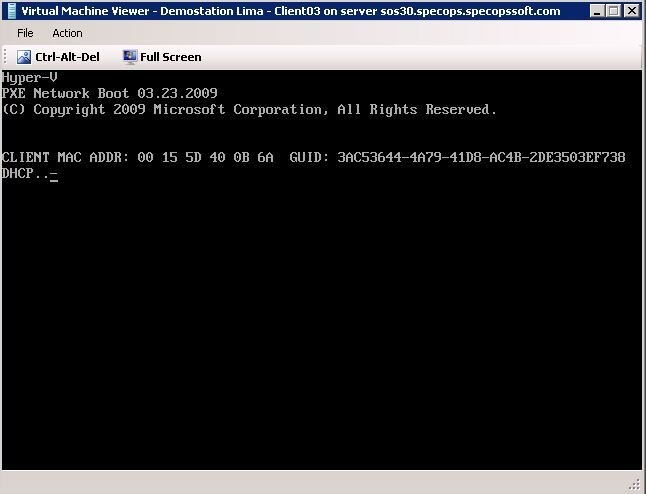
Client PXE Booting!
In my environment, I didn’t even have to reboot to retry the PXE Boot process. The client will send one PXE Request, which is picked up by the script, and the next PXE Request is then answered.
It would be great to know if you find any use for this solution and will be using it.
As always, feel free to let us know if you have any questions! And also drop me a mail if you want to try this out before Deploy 4.6 is released and I’ll send you the 4.6 PowerShell stuff that’s needed.