
This website uses cookies to ensure you get the best experience on our website. Learn more
Part II – The Fully Automated Capture and Deployment Setup
Table of Contents
OU Structure
The first thing we need to do, is to get the Base OS (Windows XP and Windows 7) to install
on two clients with the latest Patches. We do this at first semi-automatically and then add the automatic start of the Virtual Machines at the end when we got the rest in place.
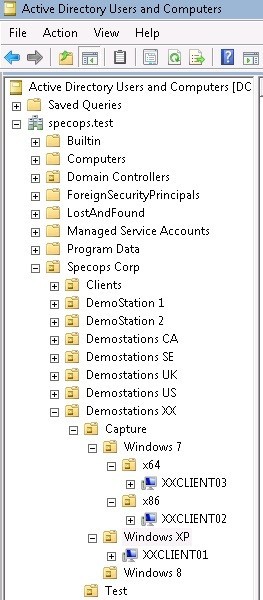
I’ve got a OU structure like this.

Basically, you need a “Capture OU” where you can block inherit of GPO’s and separate some Windows XP and Windows 7 settings.
It’s possible to use just one OU and control which GPO’s gets applied by using WMI filtering for WinXP and Win7. I would do that in the “production” OU’s so I wouldn’t have to manage thousands of clients in separate WinXP and Win7 OU’s.
But, since this will be applied to only a few clients I’ve just created two OU’s instead where I can link any OS specific GPO’s to.
And I decided to do the same for x86 vs x64. It’s possible to use security groups to make sure one client gets x64 OS and the other a x86 OS, but I tend to forget to add computers to those Security Groups. Which is why it looks like this.
Though please note, the GPO for OS Deploy will not be able to use WMI Filtering. When the client is being reinstalled, it’s not possible to read WMI data from the client to figure out which OS and settings it should have, so you would still have to use Security Groups or OU’s for that part.
OS Deploy related GPO Settings
To make sure the client doesn’t accidentally get any settings from other GPO’s and is as clean as possible, I’ve blocked inheritance of GPO’s and will either link policies into the OU or preferably create specific Capture GPO’s here, else there is a risk some other admin might add stuff to the linked GPO not being aware that it will also affect the Capture clients.
The OS Deploy related settings in each GPO are like this (only difference is the OS and if it should Force x86 or not).

For any new customers. OS Deploy will automatically detect and install a x64 OS on a compatible computer, and a 32bit OS on a x86 computer.
But if use the Force x86 setting, a 32bit OS will be installed on both a x64 and x86 computer.
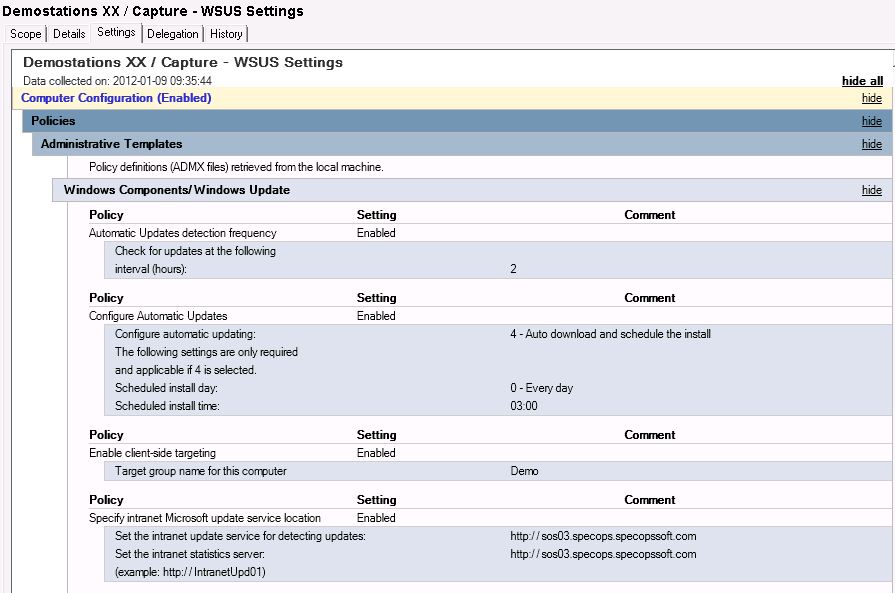
As you can see, I’ve specified that it should use our internal WSUS server. Remember to use the format http://server.domain.com (and possibly :port if you are not using the standard port 80).
More info on that part below.
I’ve also chosen to specify a Local Admin password for the image instead of using a randomly generated password, due to two reason.
- I want to still be able to log on if the computer does not join the domain for some reason.
- We need to specify the same Local Admin password during deployment of Windows XP, or the TaskSequence won’t be able to log on automatically.
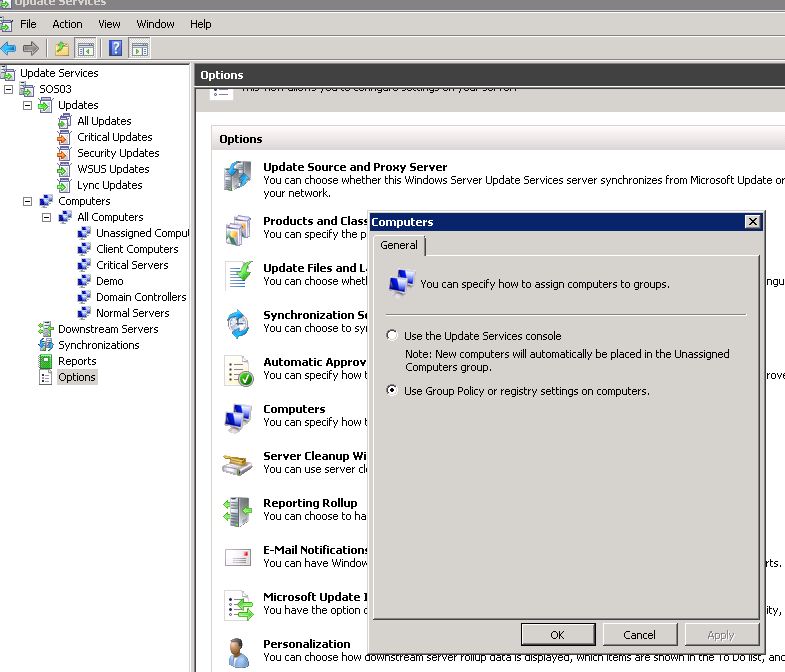
WSUS Settings
I’m assigning clients on the WSUS Server to a Computer Group via Group Policies, in this case the Computer Group is called Demo which has all the approved patches for my images and demo clients.
And we are of course also using Automatic Approval Rules to always get the latest updates automatically approved for that group of clients first, and later approved for the production environment.
Specops Deploy (via MDT) will automatically run Windows Update and patch the client during OS installation if you have specified that in your OS Deploy Policy. You can either use a internal WSUS server or the Microsoft Update server. An internal one is much preferred since you get more control that way, and your clients do not have to download all the patches over internet.
The ZTIWindowsUpdate.wsf script may reboot the client multiple times during this process and will not consider the OS to be completely installed until all approved patches are installed.
But, it will of course increase the total installation time! On the other hand, the patching will have to be done sooner or later. I prefer to do it rather sooner than later, so the client is patched and not vulnerable longer than needed.
Here is where I’ve specified the Target Group.
I’ve noticed on occasions that the ZTIWindowsUpdate script reports that all patches are installed, but if you later run the Windows Update client manually, it will find additional updates.
It’s unclear why this is happening, I’ve asked Johan Arwidmark (Microsoft Deployment guru #1. What he doesn’t know about deployment is not worth knowing) who has also notices that behavior sometimes but has not looked into it deeper.
Keith who wrote the ZTIWindowsUpdate.wsf script explains a bit about the problem:
He says:
By default, ZTIWindowsUpdate.wsf will install everything from the WU/MU servers. There are some exceptions:
- If the package says that it “can” request user input, then we skip over the update. ZTIWindowsUpdate.wsf should be fully automated, and User Input could break automation. I added this primarily for IE7 and IE8 updates. So be sure you have IE8 install packages elsewhere if you require IE8.
- We skip Windows Vista and Windows 7 Ultimate “Language Pack” files. It’s just too much data to download.
- We can also skip packages for a specific KB article, or by Package ID.
In my WSUS Group Policy, I’ve specified that it should check for updates every 2 hours for the imaging clients, which seems to work quite well. The windows update client will then install any patches that ZTIWindowsUpdate.wsf script missed.
But if you do have problems with some patches not installing before the capture runs, you might want to reduce that time so the check happens sooner.
I’ve also made my capture process to force detection of WSUS Patches on the client, before executing a Capture, just to make sure it’s fully patched and MDT didn’t miss any.
Local Windows Firewall
We also have to open up the Firewall a bit, to be able to read some WMI information and prepare the client for capture.
You can choose to create a GPO which opens just the necessary ports or disable the Firewall all together. Most customers I’ve talked to choose to disable the Firewall, but I’ll walk the extra mile and just open the needed ports.
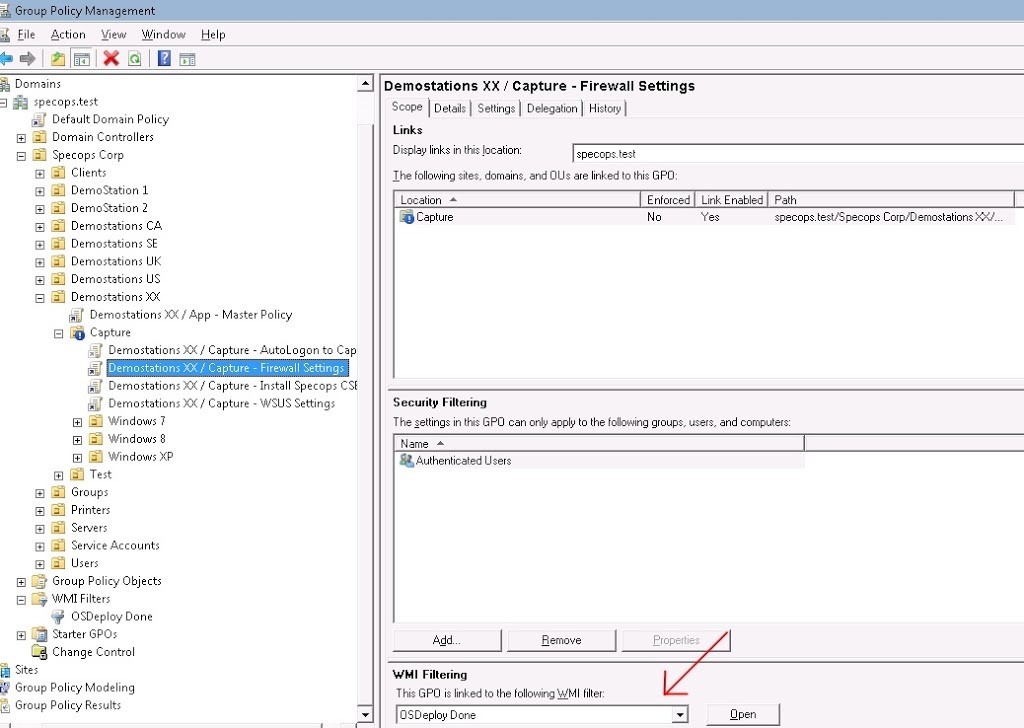
No matter which path you take, I strongly recommend you to set a WMI filter on the Firewall GPO, so it’s not applied until the OS is fully patched and done.
It would be really bad if the Firewall were disabled/opened before the client is patched and you had a worm/virus on the network which would then give you an infected image.
The WMI Query I’m using is; Select * From CIM_Directory Where Name = ‘C:\Windows\Temp\DeploymentLogs’
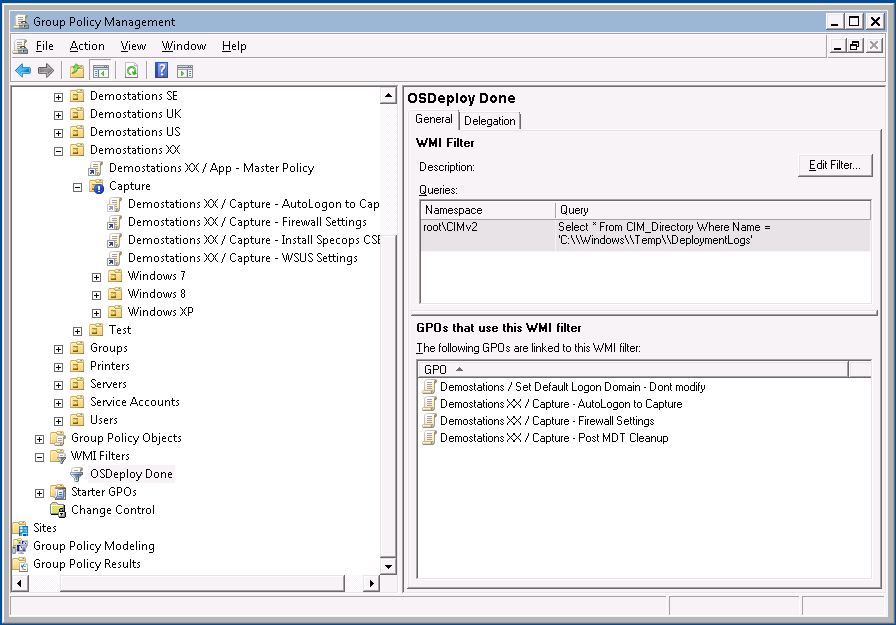
It will check for the presence of the C:WindowsTempDeploymentlogs folder, which is created at the end of the OS installation. We then know that all security patches have been applied to the client, and it’s quite safe to open up the ports.
These ports are needed for communication from the Admin tool to the client.
|
Name
|
Port
|
Description
|
|
Microsoft CIFS
|
445/TCP
|
Fileshare Traffic
|
|
RPC
|
135/TCP
|
Remote Actions
|
|
RPC High Ports
|
49152-65535/TCP
|
For Vista and later
|
I also add Ping to the Firewall Exceptions so it’s easier to verify if the client is online and so on.
And the good thing is that since this is Group Policies, it’s just applied to the captured image right now. The settings will not persist to the clients later on when the image is being deployed.
We have so far setup an OU structure that will support our automatic capture and make it easier to configure the client to get all the WSUS Patches during OS installation and then open up some ports in the Firewall to prepare it for capture.
Pre-Capture Tasks
This is a good moment to consider if there is something you would like to add to your image before doing a capture.
This is an optional step, to include the Specops Deploy CSE in the image.
We choose to include the Specops Deploy CSE (Client Side Extension, which makes it possible to read Specops Group Policies) in our images, because it will help with application deployments later on.
Basically, if the CSE is installed all applications can be installed during the first reboot of the client and the computer will be completely installed and ready when OS installation is done.
Compared to if you don’t include the CSE, then the CSE will be installed on the first reboot and it’s possible the apps will not be installed at once. So when the OS looks like it’s installed and done, there are still some apps that will not have been installed until next Group Policy refresh (about 2 hours later).
But you can choose whichever feels best to you. It’s not wrong to exclude it from the image.
Windows will usually reboot 2 times during the OS installation. First time when it has joined the domain and will then install the CSE at that run, and then reboot at least once more after the OS installation is done, where it will install all applications.
So, instead of including the CSE in the image, you could rather add an extra reboot to the task sequence if needed to be safe.
You can either link the same GPO that’s installing the CSE on your clients today to the Capture OU or create a new one. If you do link your existing GPO, make sure there are no other settings in the policy that could cause problems with the OS Deployment or settings that you don’t want in your image!
I prefer to use a new GPO to make sure it’s clean and no one accidentally adds stuff to the GPO that effects my capture process.
I’ve linked my “Install Specops CSE” policy to the Capture OU, so it’s applied to all my various images.

There are a few things I would like to take the opportunity to point out here.
I’m always using a DFS share (Stand alone or Domain integrated does not matter) to install applications from, both the CSE but also Apps deployed with Specops Deploy. It makes it so much easier in the future when you need to rename a share or setup a new server, or you need to deploy an additional deployment server in another location etc.
All clients will automatically use the closest installation share based on “Sites and Services” and if you need to rename a server or share, you don’t have to modify the install path for hundreds of applications.
Always put each version of the CSE in its own unique folder. I always use the version number as folder name. Because, when you want to upgrade the CSE to the next version, it will uninstall the old version and need access to the old install files!

If you choose to just replace the old file with the new one, the client will not be able to locate the old install file and the uninstall + upgrade will fail! Very bad…
So always make sure it has access to both the old and new installation files.
For the x86 version, uncheck the option that it can be installed on a x64 computer.
Your 64bit clients should use the 64bit version and nothing else.
PreStaging virtual clients
Next part is to see how well things works so far.
Prestage 3 computers, each into their own OU’s so we can try out Win7 x86, Win7 x64 and WinXP x86.
In Hyper-V, it’s only the old emulated Network Card can PXE Boot. But it’s unfortunately limited to 100mbit. So when I’m creating virtual machines in Hyper-V/SCVMM that will PXE boot I usually assign two NICs to each client.
One Emulated NIC that it will PXE Boot and then also a Synthetic NIC. Because when WinPE starts, it will get a DHCP address for each NIC and the fastest card will be the primary card, making the download of the image a lot faster!
This picture shows a Virtual Computer with 2 NIC’s. One Emulated, Intel 21140-Based PCI Fast Ethernet Adapter (the left) which is a 100 Mbps card compared to the Synthetic, Microsoft Virtual Machine Bus Network Adapter (the right) that is 10 Gbps.
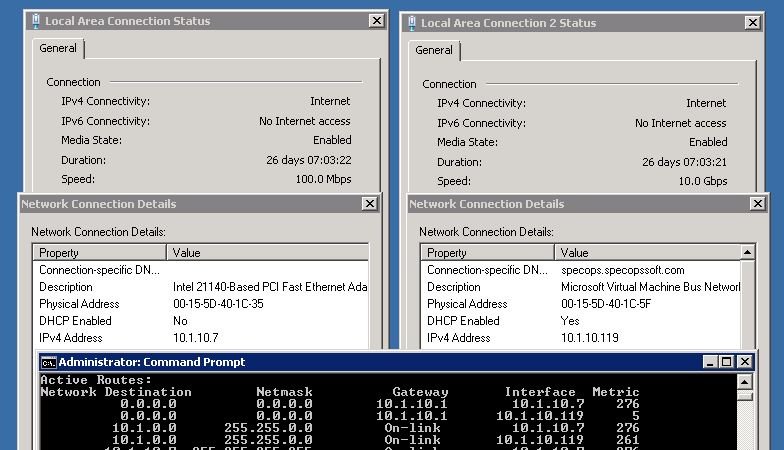
You can see on the routing table that it will be using the faster NIC (lower Metric).
The Synthetic card is, in theory, like 100 times faster than the Emulated. And with the clients and host on the same virtual host, it will be the HDD’s that’s limiting the speed, not the network card. Though, obviously if the client and deployment server are on separate hosts, the network and/or disk will limit the throughput no matter which virtual NIC you are using.
Just remember to use the MAC address of the Emulated NIC (PXE NIC) when you are prestaging. If you are not using the GUID, of course.
I’ve had some issues with VMWare NIC’s in later versions of ESX. Where it was hard to find a Network Card that worked both for PXE and inside the WinPE and then in Windows XP also.
The network card that worked in the WinPE didn’t have a XP driver, and the other way around.
And the one that could PXE boot, didn’t have a Win7/WinPE driver. This was on a fresh install of VMWare, my colleague who had upgraded from a previous version of VMWare did have a network card to worked in both environment. Well, I’ve not worked with VMWare a lot and I probably did something wrong 🙂
But after googling a lot and noticing that there were more admins than me out there with the same problem, I ended up using two NIC’s on those VM’s too so they could both PXE Boot, use WinPE and still run both XP and Windows 7.
Base OS Deployment
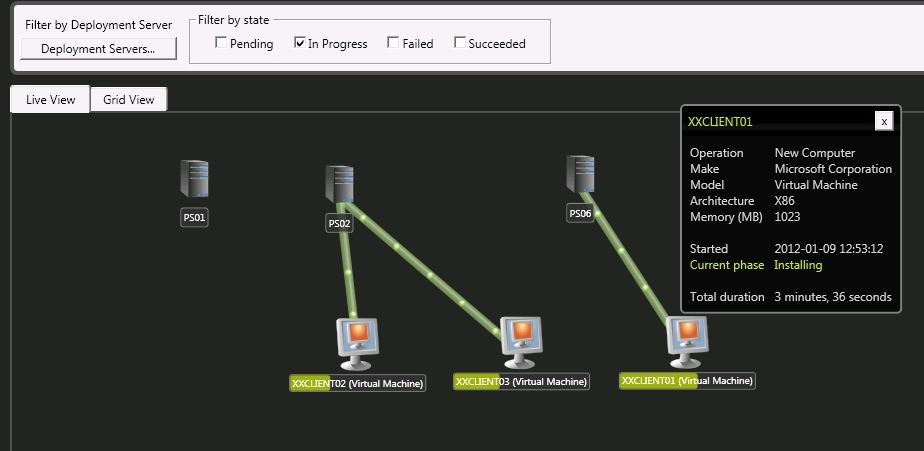
Hopefully, your OS Deploy feedback will look as good as mine does here, with your three clients installing.
This step will probably take a while, especially on Windows XP, where it has to install a million security updates.

I got some DLL error messages during the patching after first reboot on my Windows XP.
It was related to Internet Explorer 8, so I’ve currently declined that update in WSUS for my capture, until I’ve time to figure out why it’s happening.
Verify GPO settings
When at least one client has finished the installation it’s time to verify that the Firewall policy worked.
I initiated a manual Operating System Capture, and we can query for the information from the client, plus copy the .cmd file to the local system.
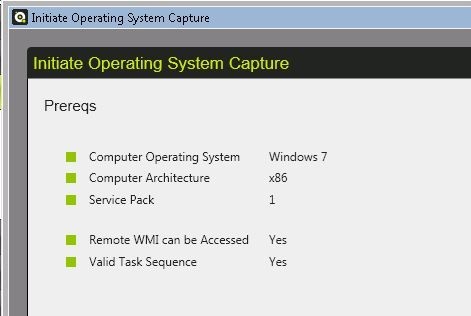
So far so good.
Open Add/Remove Programs and verify that the “Specops Deploy Client Side Extension” has been installed correctly.
Completion
And for some of you, this will be enough. There is no real reason to automate it further than this. You now have an automatic process for creating your new images. Which will be fully patched and ready to be captured.
Next time, all you have to do is choose reinstall on your 3 clients and start them to get new fresh images. You don’t have to re-create your virtual machines or pre-stage them again, just reinstall the current ones with the Base OS + patches.
Feel free to use the comments field for questions.
Last updated on November 8, 2024