This is a simplified version of the Specops Support pages, optimized for users of Internet Explorer (version 10 and 11). To view the full version, please access this page using another browser, such
as Chrome, Edge or Firefox.
The
Specops Authentication migration wizard can be used to migrate the enrollment data from
Specops Password Reset (SPR) into
uReset 8 and above. This allows SPR users to authenticate with O365, and manage password resets, with their existing SPR enrollment.
Pre-migration
Verify that users know their UPN (email format) names. To align with the standards used in Cloud solutions, older style usernames are not supported.
NOTE
Rather than using “sAMAccountName” to identify users, Specops Authentication uses “User Principal Name” (UPN). It is recommended that the UPN is consolidated to match user’s email addresses. This makes it easier for users to remember their UPN during
authentication.
Existing policies cannot be migrated automatically. You can create new policies from the
uReset menu in the
Specops Authentication Gatekeeper Tool.
The migration tool can only migrate
Mobile Code (SMS) and Questions and Answers. In order to migrate these across, you must have these identity services configured in your
uReset 8 group policy.
Before you get started, you must meet the following requirements for a successful migration:
Specops Authentication customer account with the
Gatekeeper Admin Tool installed and configured.
The scope where the SPR enrollment data resides, must be inside the
Specops Authentication scope of management.
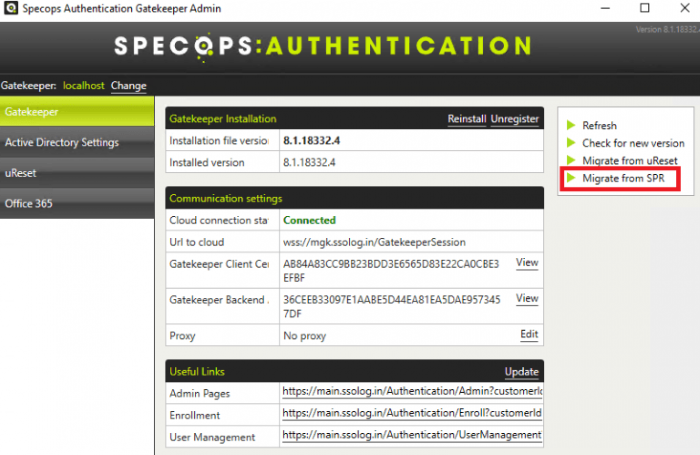
From the Gatekeeper tab on the
Specops Authentication Gatekeeper Admin tool, click Migrate from SPR.
Click Next.
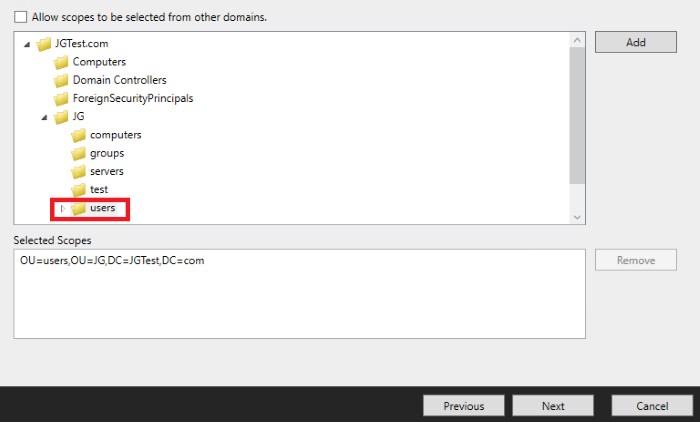
Select the Active Directory scope containing the SPR user enrollment data that you want to migrate across. For example: you might select the Users Organizational Unit, if it contains all the users you want to migrate.
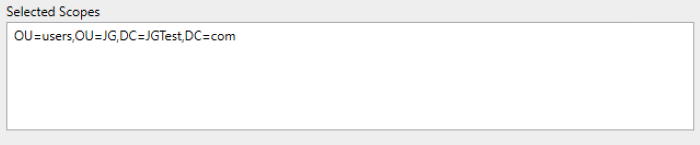
Click Addand the scope will appear in the
Selected Scopes box.
Click Next.
Select your migration options:
Overwrite existing
Specops Authentication enrollments: Migrate user enrollments for users that already have a Specops Authentication enrollment. Users that have already enrolled with
Specops Authentication will have their entire enrollment overwritten. Identity Service enrollments cannot be merged with enrollments from SPR. Leaving this unticked will not update these users’ enrollments.
Halt execution on errors: If you select this option, the migration will be stopped as soon as an error occurs. If this is left unselected, the migration will continue until all users have been migrated. Any errors will be visible in the Event Log in the
Gatekeeper afterwards.
Specify the Active Directory attribute name that is used to store mobile numbers of users that exist.
Tip: If you do not want the mobile data to be migrated across from SPR to
Specops Authentication, you can specify an attribute that is not used instead, and the mobile data will be omitted.
Click Next.
Your pre-migration overview will be displayed, such the number of users, enrollments, and the Active Directory scope you have selected.
Click Next.
Your post-migration overview will be displayed. Click
Finish.
Click Finish to start the migration.
Note: The migration wizard will appear in the
Gatekeeper Admin Tool user interface if the SPR service connection point exists in Active Directory. To remove the Migrate from SPR button from the interface, run the following command in PowerShell, and remove the listed objects from Active Directory.
Ensure that the authentication policy for password resets in Specops Authentication matches the authentication policy used in SPR.
Install the
Specops Authentication Client (version 7.12.18107.4 or later).
Migrating from
Specops uReset 7.x
Introduction
This guide provides you with the necessary steps to migrate from Specops uReset 7.12 and earlier, to Specops uReset 8.0 and above.
Specops uReset 8.0 is an upgrade for Specops uReset 7.12, and comes with several improvements and new features. Unlike previous uReset upgrades, you cannot simply click the Check for new version link in the Specops uReset Administration
tool and apply these changes, as Specops uReset 8.0 is an entirely new platform. To upgrade, you must:
Step 1: Install and configure the Specops uReset 8.0 platform.
Step 2: Sign up for a Specops Authentication account.
Step 3: Migrate your user and enrollment data across to Specops uReset 8.0.
The registry keys created by the ADMX template can be found here: HKEY_localMachine\Software\Policies\Specopssoft\Ureset\Client
Before you can migrate your users and enrollments, you must download and deploy Specops uReset 8.0.
Download the ADMX template for Specops uReset 8.0 here.
Copy the ADMX template and the corresponding ADML file (you can find these in the c:\windows\policydefinitions) to the SYSVOL Central Store (if you want to make this available to more than one server) or copy it locally. The settings
in this client ADMX template tells both clients to continue using the Specops uReset 7.12 instead of automatically redirecting to Specops uReset 8.0. This means you can continue using the old version unaffected, until you are ready
to start migrating over.
Create a computer GPO and apply it to all computers that will have the Specops Authentication client installed, and configure the following settings under the ‘General Client Settings’ section of the template. This step is critical in ensuring that your workstation clients are not directed to uReset 8.0, before you have completed configuration and migration.
the settings container from the uReset 7.12 Administration tool. The default location is under the System container in Active Directory. Example:CN=Settings,CN=uReset,CN=Specops,CN=System,DC=demo,DC=local
Under the “Type of reset system” option select uReset.
Save the new policy and apply it to all computers that have the Specops Authentication Client installed.
Verify that the policy is being correctly applied to your client computers.
Download the latest Specops Authentication client, here.
Deploy the Specops Authentication client to all of your client computers. Older versions of the Specops Authentication or Specops uReset client will be replaced automatically.
Install Specops Authentication. Installation instructions can be found here.
NOTE
When you copy the ADMX template to your chosen location, it will override the existing template.
STEP 2. Signing up for a Specops Authentication account
NOTE
This step should not be performed until the Client ADMX step (see above) has been completed.
Follow the instructions under the Create a customer account section, under Installation, to sign up for a Specops Authentication account.
STEP 3. Performing the migration
The Specops Authentication migration wizard can be used to migrate the enrollment data from Specops uReset 7.12 into Specops uReset 8.0. This will allow uReset users to verify their identities before resetting or changing their own passwords
or recovering encryption keys via self-service or through the IT service desk, with their existing uReset enrollment.
Pre-migration:
When migrating to Specops uReset 8.0, the platform hosting the datacenter will change from
Microsoft Entra, to Amazon Web Services.
Existing policies cannot be migrated automatically. You can create new policies from the uReset menu in the Specops Authentication Gatekeeper Tool.
Stylesheets utilizing Bootstrap 4 will require an upgrade.
Auditing, reporting, and user statistics has been significantly improved in Specops Authentication. Existing statistics from www.ureset.com will not be migrated.
From the migration wizard, you can migrate enrollment data for the following identity services:
Questions & Answers (Security Questions)
Mobile Code (SMS)
Symantec VIP
Specops/Microsoft/
Google Authenticator*
Specops Fingerprint Authenticator*
Mobile Bank ID
Google (Gmail)
Live
Instagram
LinkedIn
Salesforce
NOTE
The
Duo Security identity service does not require migration. If
Duo Security is enabled in the policy, all affected users will be enrolled with
Duo Security on Specops Authentication.
* Before proceeding with migrating Specops/Microsoft/
Google Authenticator or
Specops Fingerprint, please contact support.
Requirements for successful migration
Before you get started, you must meet the following requirements for a successful migration:
Specops Authentication customer account with the Gatekeeper Admin Tool installed and configured.
The scope where the Specops uReset enrollment data resides must be inside the Specops Authentication scope of management.
Migrating
From the Gatekeeper tab on the Specops Authentication Gatekeeper Admin tool, click Migrate from uReset.
Click Next.
Select the Active Directory scope containing the uReset user enrollment data you want to migrate to Specops Authentication, and click Next.
Enable your migration options:
Overwrite existing Specops Authentication enrollments: Migrate user enrollments for users that already have a Specops Authentication enrollment. Users that have already enrolled with Specops Authentication will have their entire
enrollment overwritten. Identity Service enrollments cannot be merged with enrollments from uReset. Leaving this unticked will not update these users’ enrollments.
Halt execution on errors: Stops the migration as soon as an error occurs. The migration must be restarted on errors. If this is left unticked, the migration will keep going until all users have been migrated. Any errors will be
visible in the Windows Event Log on the Gatekeeper afterwards.
Click Next.
Your pre-migration overview will be displayed. To continue, click Next.
Your post-migration overview will be displayed. Click Finish.
Click Finish to start the migration.
Updating users outside process GPO’s
For users with workstations who are regularly not part of process GPO’s (e.g. users working from home), some additional steps need to be performed.
Copy the registry keys generated by the ADMX template (more on ADMX templates can be found here).
Push the keys to the users in question using your desktop management tool of choice (e.g. Microsoft Intune), or by running a start-up script.
You are now ready to direct your users to uReset 8.0.
Remove the computer GPO created earlier with the settings container override setting – your Specops Authentication clients will now default to using the new version automatically.
Update any bookmarked URLs or GPOs with URL Override settings.
Why should you upgrade to the new platform?
Although Specops uReset 8.0 performs the same job as Specops uReset 7.12, it comes with several new features and enhancements. These are as follows:
Added support for following new identity services:
Okta, Ping ID, Trusted Network Location (location/IP based authentication), email verification, all of which support auto enrollment
Ability to select between a NA or EU data center for compliance purposes
Geo-location blocking to allow or disallow IP addresses or countries from accessing the service
Ability to add an MFA policy for password change
Multi-Gatekeeper support for fail over/redundancy
Updated IT service desk component (formerly known as user management) which includes a more streamlined authentication experience with a quick verification option, forced user verification and tracking/logging.
Updated
Duo Security and
Symantec VIP identity services for a more streamlined user experience and as quick verification options in the IT service desk component.
Support for displaying the Breached Password Protection rule during password change when using uReset and Specops Password Policy with the Breached Password Protection add-on. uReset MFA enrollments can be extended seamlessly to protect
encryption key recovery when using uReset with Specops Key Recovery
Added support for more languages: Japanese, Portuguese, Simplified Chinese, Traditional Chinese, Polish, Korean and Czech
New Features, changes and improvements
This section highlights the differences between the two platforms. Certain elements have changed entirely and some have simply been moved and/or renamed.
URLs
The URLs in Specops uReset 8.0 differ from those found in Specops uReset 7.12.
Specops uReset 7.12 uses www.ureset.com (NA) and the login.ureset.com (EU). These URLs have been deprecated and each uReset web link now has a corresponding URL under login.specopssoft.com (NA) and eu.login.specopssoft.com (EU)
instead.
NOTE
The following screenshots are from environments hosted in North America.
URLs in Specops uReset 8.0:
The following URLs are found under the Gatekeeper tab in the Specops Authentication Gatekeeper Admin tool:
Admin Pages: This URL takes you to the administrative pages. Admins can configure various parts of the system. This includes:
Configuring enrollment/admin policies.
Configuring identity services.
Creating and deleting accounts.
Customizing parts of the Specops uReset 8.0 user interface.
Adding and removing Gatekeepers.
Enrollment: This URL takes you to the Enrollment page, where you must enroll in order to access the administrative pages, user management pages, and uReset.
User Management: This URL takes you to the User Management page, in which you can search for users, reset their passwords, and use uReset identity services to authenticate users. Helpdesk has replaced User Management in uReset 8.0.
The following URLs are located under the uReset tab in the Specops Authentication Gatekeeper Admin tool:
Reset Password: This URL takes you to a page in which you can reset your password.
Change Password: This URL takes you to a page in which you can change your password.
URLs in Specops uReset 7.12:
In Specops uReset 7.12, the URLs are located under the uReset Gatekeeper tab, in the Specops uReset Administration tool.
Security Groups
Security groups in Specops uReset 8.0:
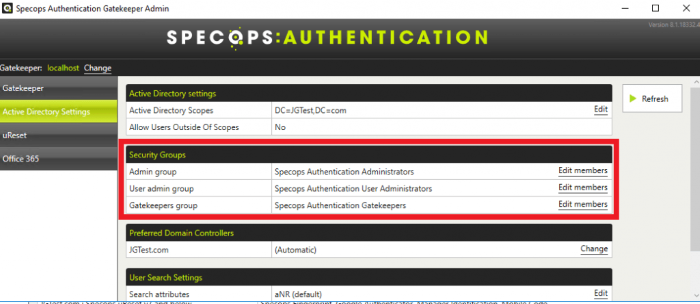
Specops uReset 8.0 comes with new admin and user management related groups, that do not exist in Specops uReset 7.12. When you install Specops uReset 8.0, three new global groups are automatically created in your Active Directory. These groups
fall under a single Security Groups category. You can edit the members of these groups directly in the Specops Authentication Gatekeeper Admin tool, by clicking the Active Directory Settings tab. These are as follows:
Admin group: All admins are listed in this group.
User admin group: All user admins are listed in this group.
Gatekeepers group: Your gatekeeper service account(s) are listed in this group.
NOTE
The uReset ‘helpdesk’ has been renamed ‘User Management’ in Specops uReset 8.0.
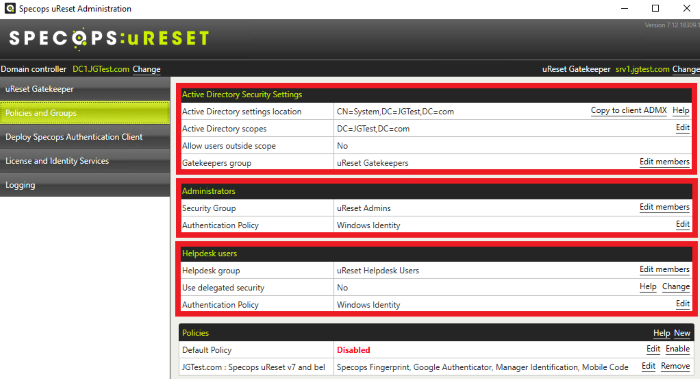
Security groups in Specops UReset 7.12:
In Specops uReset 7.12, the various security groups are located under the Policies and Groups tab, in the Specops uReset Administration tool, and are separated out into different categories (Active Directory Settings, Helpdesk users,
Administrators).
Policies
Policies in Specops uReset 8.0:
In Specops uReset 8.0, policies are tagged in the Specops Authentication Gatekeeper Admin tool (on premises component) but configured in Specops Authentication Web (cloud component).
NOTE
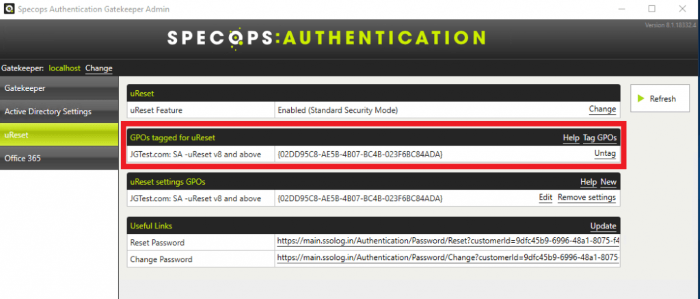
You can use the same GPOs in Specops uReset 8.0, that you used in Specops uReset 7.12. To tag a GPO:
Open the Specops Authentication Gatekeeper Admin tool.
Click the uReset tab.
In the GPOs tagged for uReset section, click the Tag GPOs link.
Select a policy from the list.
Click OK.
The policy will appear in the list.
Policies in Specops uReset: 7.12
n Specops uReset 7.12, policies are configured in the Specops uReset Administrator (on premises component) and stored in SYSVOL.
Removed features and ID services
Changed features
The
Secret Questions identity service is now configured globally instead of per policy.
Enrolled users report.
Removed identity services
Amazon
Box
Instagram
Salesforce
Yahoo
Customizing the uReset user interface
As with Specops uReset 7.12, you can customize various parts of the Specops uReset 8.0 landing page. However, which parts that can be customized differs slightly from uReset 7.12. To access the customization features, go to the Customization menu. The following aspects of uReset 8.0 can be customized.
Changing the main logo
The logo at the top left of the page, both in Authentication Web and the Authentication Client, can be changed to match your requirements.
Click Browse and select the image you want to use.
Click OK.
Click Upload to place the image.
To revert to the default image, click Default.
Main logo image specifications
The following specifications apply to the main logo image:
Supported file types: png, gif, jpg.
Maximum file size: one megabyte (1 MB).
Transparency in png images will be rendered as expected, with the background color showing through the transparent parts.
Image will be rendered with a height of 40 pixels.
Aspect ratio of the uploaded file will always be kept intact.
Images with a height less than 40 pixels will be scaled up to 40 pixels. The quality of the rendered image will decrease.
Images with a height above 40 pixels will be scaled down to 40 pixels. Quality is not necessarily affaected.
For the best results, use an image width with a height of exactly 40 pixels and a width that is no greater than 300 pixels. If the image is too wide, there won’t be sufficient room to render the menu items in the header.
Changing the login image
You can also change the image on the login page that is presented to users.
Click Browse and select the image you want to use.
Click OK.
Click Upload to place the image. The image will appear at the top left of the page.
To revert to the default image, click Default.
Login image specifications
The specifications for the login image are the same as for the logo (above), except for the size. The login image has a maximum width of 235 pixels. Images less than 235 px wide will be scaled up (which will decrease the quality of the image),
and images more than 235 px wide will be scaled down. The aspect ratio of the original image will always be kept in the rendered image.
Changing the colors
Various colors in the interface can be change to match your comapny’s look and feel. The colors that can be changed are:
Page background (page’s main content area)
Menu background (top and side navigation)
Sign-in background (login page)
Default button (primary buttons)
Secondary button (buttons such as Cancel etc.)
Information box background (textboxes with additional information)
To change the color:
Select the checkbox next to the color you want to change.
Select the color you want to use:
Click the color-picker icon and select the color you want, then click OK.
Enter the HTML color code (hexadecimal color code) in the text field.
To revert to the default color for all elements, click Default.
Changing the texts
Various texts that are presented to the user in messages and notifications can also be changed.
Select the language you want to make changes to in the Language drop-down.
Click the text element you want to change, for example Enroll_Completed_Header.
Select Use custom.
Enter the text you want to use in the Custom text field and click Save. The Customized column in the list will now show a checkmark at the text element you changed, while the Customized value shows the new text.
To revert to the default text, click the text element, and select Use original, then Save. This will delete the custom text. Note that only deleting the custom text will not revert the text element to the
default state (instead, the text field will then be blank).
Text label
Description
Default text
Enroll_Completed_Header
Header for page shown when users have met the weight requirements, with option to continue or end enrollment process.
All done!
Enroll_Completed_Message
Information text for page shown when users have met the weight requirements, with option to continue or end enrollment process.
You have collected enough stars for your enrollment. Feel free to improve you enrollment information by collecting more stars.
Enroll_CompletedCompleted_Message
Text on final page of enrollment process.
You have completed the enrollment, you can now close this browser and move on with your day.
Enroll_Edit_Help
Text on identity services page when users has opted to make changes to an already complete enrollment.
Add or change identity services from the lists below. Make sure your star bar is still full after the changes.
Enroll_Help
Text on identity services selection page during enrollment.
Use the identity services below to identify yourself until you have collected enough stars to fill the star bar.
Enroll_Index_Message
Text displayed when user switches between services to enroll for (e.g. Admin, User Management etc.)
You can enroll for multiple services. Select which service to enroll for. You can also make changes to a completed enrollment.
Enroll_Introduction_Header
Header on the first page of the enrollment wizard (before entering password)
Enrollment Reminder
Enroll_Introduction_Message
Text on the first page of the enrollment wizard (before entering password)
You are required to enroll for the Password Reset service. Press the button below to start the enrollment wizard.
Error_Mfa_UserHasNoPolicy_Message
Error message text displayed when a user who does not have a policy configured tries to sign in.
No policy has been configured for you for this service.
Error_Mfa_UserHasNoPolicy_Title
Error message title displayed when a user who does not have a policy configured tries to sign in.
You cannot enroll for this service
Mfa_Menu_Message
Text on identity services selection page during login.
Use the identity services below to identify yourself until you have collected enough stars to fill the star bar.
Mfa_NotEnrolled_EnrollmentMissing_Header
Header displayed when a user is not enrolled with uReset and tries to reset their password.
Enrollment missing
Mfa_NotEnrolled_IsuReset_Information
Text displayed when a user is not enrolled with uReset and tries to reset their password.
You cannot reset your password because you have not enrolled for the reset password service.
Password_Complete_Message
Text on final page for a password reset or password change.
Your password has been changed! If using a Windows computer, it is recommended to sign-out and sign-in again with your new password. Also, don't forget to update to your new password in for example the email app on your phone,
if necessary.
Password_CompleteSecureBrowser_Message
Text on final page for a password reset or password change that started from the Windows identity password view.
Your password has been changed! Don't forget to update to your new password in for example the email app on your phone, if necessary.
Password_Instructions_Message
Text displayed above password rules when performing a password change or password reset.
Password_Instructions_Mobile_Header
Clickable text displayed on small devices to expand the password instructions, above the password rules when performing a password change or password reset.
Show instructions
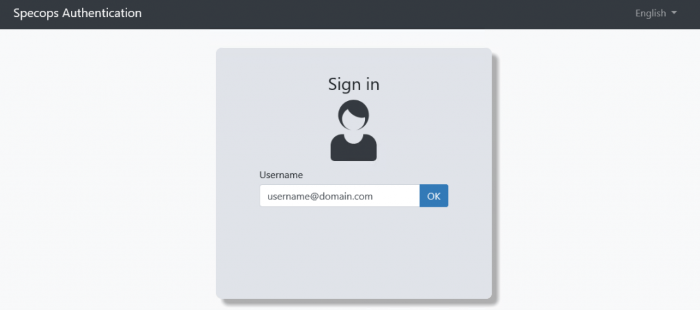
SkipCredentialScreening_UserName_Label
Text displayed when a user enters their username during sign-in.
Username
UserManagement_SearchInformation
Text displayed on the User Management start page.
Use the search box to find users. You can search by account names, email addresses or users' real names.
WindowsIdentity_UserName_Label
Text displayed when a user enters their password during sign-in.
Username
Licensing
Licenses are managed by the Specops team, which means a physical license key is not required. You can create your customer account using a known domain/contact here.
The Specops team can then associate it with your existing Specops uReset 7.12 subscription license.