Installation
The content below will guide you through the process of installing Specops Password Sync.
Key components
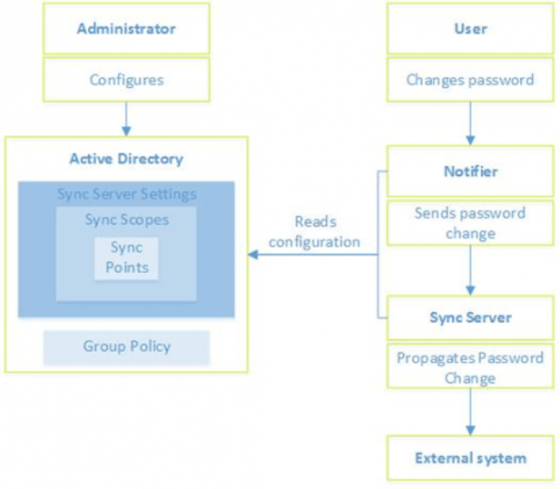
Specops Password Sync consists of the following components and does not require any additional servers or resources in your environment. The architectural overview above shows the communication between the components when completing a password synchronization.
Password Change Notifier: Reads password changes performed by the domain controller and sends password synchronization requests to the Sync Server.
Sync Server: Synchronizes new passwords to connected systems.
Administration Tools: Configures the central aspects of the solution and enables the creation of Specops Password Sync settings in Group Policy Objects.
Requirements
Your organization’s environment must meet the following system requirements:
| Component | Requirement |
|---|---|
| Password Change Notifier |
|
| Sync Server |
|
| Administration Tools |
|
The Specops Setup Assistant will help you meet the system requirements.
Installing Specops Password Sync
During installation, Specops Password Sync will launch the Setup Assistant. The Setup Assistant contains installation information for all products from the Specops Password Management solution including Specops Password Sync, Specops Password Policy, and Specops Password Reset. You will only need to complete the steps for Specops Password Sync.
The Setup Assistant will help you install the following components for Specops Password Sync:
- Password Change Notifier
- Sync Server
- Administration Tools
- Download the Setup Assistant.
-
Save and Run the Setup Assistant on your server.
Note
By default the file is extracted to
C:\temp\SpecopsPasswordSync_Setup_[VersionNumber] -
Double click SpecopsPasswordSync_Setup_[VersionNumber].exe to launch the Setup Assistant.
- To begin, click Start Installation in the Specops Setup Assistant dialog box, and Accept the End User License Agreement.
Installing the Password Change Notifier
The Password Change Notifier must be installed on all domain controllers in your Active Directory. You can install the Password Change Notifier from the setup assistant, or you can deploy the Password Change Notifier through Group Policy Software Installation (GPSI) to ensure that new domain controllers automatically receive the Notifier.
- From the Setup Assistant, click Password Change Notifier.
- Verify that the computer is running a valid server operating system.
- Click Install.
Deploy the Password Change Notifier through GPSI
-
Copy the MSI packages for the Password Change Notifier to a file share in your network infrastructure.
Note
- By default, the file is extracted to:
C:\Temp\SpecopsPasswordSync_Setup_<ver>\Products\SpecopsPasswordSync - Specops recommends using DFS shares as it permits load sharing and location independence.
- By default, the file is extracted to:
-
In your domain, create a new GPO and link it to the Domain Controllers Organizational Unit.
- Enter a name for the GPO, and click OK.
- Right-click the newly created GPO, and click Edit.
- Expand Computer Configuration, Policies, Software Settings.
- Right-click Software installation, and select Properties.
- Browse to the location of the msi package.
- Enable the Assign deployment option.
- Click OK to save the package.
- Restart the domain controllers.
Installing the Sync Server
The Sync Server synchronizes new passwords to all systems the user has been configured to synchronize to through the Specops Password Sync Group Policy settings. Depending on the amount of users in your environment, and the frequency with which they change their passwords, you may require more than one Sync Server.
- From the Setup Assistant, click Sync Server.
-
Verify that you have fulfilled the prerequisites. If you do not meet the prerequisites, you may need to do the following:
- Install .NET Framework 4 or later.
- Verify that you are running a valid operating system.
-
To select the certificate that will be used to verify the identity of the Sync Server to the Password Change Notifier component, click Select.
Note
- All communications between the Password Change Notifier and the Sync Server is SSL encrypted using the same certificate.
- You can use a certificate generated by the Active Directory Certificate Services or a self-signed certificate. If you are using a self-signed certificate, you will need to:
- Update the certificate once it expires (the certificate will not be automatically renewed).
- Import the certificate into the trusted roots container on all the domain controllers.
-
Click Install. The Setup Assistant will automatically use the correct msi-package for the local systems and install the appropriate version of the Sync Server.
- In the Sync Server Setup Wizard, click Next.
-
You will be given the chance to select which Sync Providers you want to install on the Sync Server. The default setting is to install all the providers that are shipped with the product. If you do not want to use a provider, click the icon next to the provider, and select Entire Feature will be unavailable.
Note
If you want to develop your own Sync Providers for the systems used by your organization, contact Specops Support.
-
Click Next.
- Click Finish.
Install the Administration Tools
Installing the Administration Tools will install the Specops Password Sync Administration tool and the GPMC snap-in. You can use the Administration Tool to configure system settings such as Sync Scopes, Sync Servers, and Sync Points. You can use the GPMC snap-in to configure Specops Password Sync policies in a Group Policy Object. The GPO can then be applied to your entire domain or a part of your domain.
The Administration Tools should be installed on the computer that you want to administer the product from.
- From the Setup Assistant, select Administration Tools.
-
Verify that you have fulfilled the prerequisites. If you do not meet the prerequisites, you may need to do the following:
- Install .NET Framework 4 or later.
- Verify that the user running the setup assistant is an Enterprise or Domain Administrator.
-
Click Install.
Post-installation configuration
You will need to complete the following configuration settings once you have installed Specops Password Sync.
Import your license key
Enter your license key in the Specops Password Sync Administration Tool.
- Open the Specops Password Sync Administration Tool.
- You will prompted to import you license key. Browse to the location of the TXT file, and click Open.
Verify that the Password Change Notifier has been installed on all of your domain controllers
Note
Your domain controllers must be restarted after the installation.
Verify that the certificate(s) used on your Sync Server(s) are trusted by the domain controllers
Add members to the Specops Password Sync local security groups
Use the Setup Wizard to create a basic configuration
The Setup Wizard in the Administration Tool Welcome page can help you quickly create and configure the basic settings needed to synchronize passwords.
To create a basic configuration, click Setup Wizard.
Create a Sync Scope
Sync Scopes are used to create a basic administration unit for password synchronization. The scope is tied to a level in your Active Directory structure and enables the use of Specops Password Sync on the user objects beneath the selected level.
In large environments, where user administration takes place in more location, you should create several sync scopes.
- Enter a name for the Sync Scope.
-
Click Browse to select the User Scope of Management.
Note
- The system defaults to assign the domain root as the Scope of Management. You should change the scope of management if you require a narrower selection of users.
- Password synchronization will occur after group policy settings have been configured for each sync point.
-
Click Next.
Configure system wide email settings
You will need to configure the default email settings used by the system to send email. You can override the system wide settings in each sync scope.
- In the SMTP Server Name field, enter the SMTP Server Name.
- In the Email Sender Address field, enter the email address from which the system should send emails from.
- In the Admin Email Address field, enter the administrative email address that will receive emails from the system.
- Click Next.
Create a Sync Point with a Sync Server and Sync Provider
The Sync Points control the settings that are used when a password is synchronized with another system.
You will require one Sync Point for each system you want to synchronize with. You configure several Sync Points to synchronize with the same external system if your organization requires different synchronization settings for different types of users.
The Sync Point also specifies which Sync Server(s) to use for synchronization, allowing you to create separate Sync Points with different server settings for different parts of your organization.
- From the Sync Server drop box, select the Sync Server you want to use with the Sync Point.
- From the Provider list, select the Sync Provider you want to use with your Sync Point. The provider is the system you want to synchronize passwords with.
- Click Next.
Configure the provider with synchronization settings
You will need to configure your selected provider with the necessary settings to connect to the remote system and synchronize passwords. The configurable settings will vary between each Sync Provider.
Create a GPO with Specops Password Sync Settings
Once you have configured the provider with synchronization settings, you can automatically create the GPO in your domain. When you automatically create the GPO, it will be linked to the same level in Active Directory as the Scope of Management selected for the Sync Scope.
You can also create it manually from the Group Policy Management Console.