Troubleshooting
The information below is intended for administrators who are responsible for troubleshooting OS deployments in their Microsoft Active Directory environment. Before you perform the tasks in this guide, please ensure you have correctly installed Specops Deploy/OS.
Common Issues
This section contains troubleshooting tips for common operating system deployment issues.
No connection could be made because the target machine actively refused it
Could not connect to net.tcp://computer.domain.local:4375/

Specopssoft.OSDeploy/DeploymentServer. The connection attempt lasted
for a time span of 00:00:01.0010531.

TCP error code 10061: No connection could be made because the target
machine actively refused it
Possible cause
When adding a remote deployment server, the tcp communications is required to establish communications to the specified port. The timeout will occur when the deployment server cant create the services on the remote system.
Possible solution
Add .Net WCF Activation in Server features. (http non—activation)
Note
Requires reboot.
https://msdn.microsoft.com/en-us/library/ms731053(v=vs.110).aspx
PXE booting fails
Possible cause
Network switches may not be configured properly. This does not allow the clients to discover all available Deployment Servers by broadcasting.
Possible solution
- Your network switches must be properly configured to work with PXE.
Default reinstall fails
Possible cause
The Client Side Extension is not installed on the client.
Possible solution
- Verify that you have a GPO with the Specops Client Side Extension
- If you do not have the Client Side Extension, you will need to do the following:
- Right-click on the OU, and click Create a GPO in this domain and Link it here.
- In the text field, enter a name for the GPO, and click OK.
- Right-click on the newly created GPO, and click Edit.
- You will need to edit the GPO with the following settings:
- Expand Computer Configuration, Policies, Software Settings, and click Software Installation. Add your msi package from your file server in the GPO.
- Right-click Specops Password Client (x86) and select Properties.
- Select the Deployment tab and click Advanced.
- Verify that the Make this 32-bit X86 application available to Win64 machines checkbox is NOT enabled.
- Click OK.
Windows Pre-installation environment (WinPE) fails
Possible cause
- Certain OS components, like device drivers, that are a required for WinPE to work, may not be present.
- WinPE cannot connect to the Deployment Share of your Deployment Server.
Possible solution
- The required drivers are pre-loaded in the boot image and may need to be added to the driver repository. The version of WinPE in the boot image is based on Windows 8. Despite what OS you intend to deploy, you must have such drivers in the repository.
- If the connection cannot be established you should verify that your network card is active, and has an IP address, that DNS name resolution is working properly and that there is no Windows security issues blocking the connection. See the MDT installation log for more details.
Drivers Missing
Possible cause
The required drivers have not been added to the driver repository.
The WMI name for the Make and Model of the computer may not have matched correctly during installation.
Possible solution
- Add the drivers to the driver repository.
- Visit your computer’s manufacturer’s website to download the drivers you want to import.
- If you download the drivers in .cab format, you will need to extract the files.
- Open the Specops Deploy/OS admin tool.
- In the navigation pane, expand Drivers.
- Right-click the folder where you wish to add your drivers and select Import Drivers…
- Enter or browse to the file path where the drivers can be found.
- Click Execute.
Connection timeout
Possible cause
The configured timeout value is too short.
Possible solution
Increase the operation timeout value, using the registry settings:
| Registry key | Step |
|---|---|
KLM\SOFTWARE\Specopssoft\Specops Deploy\Admin Tools OS |
|
When migrating User State from Windows XP an error occurs where a file cannot be found
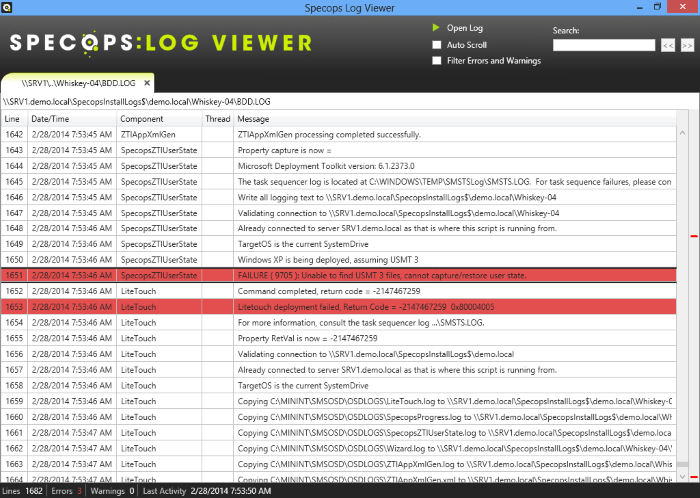
Possible cause
- MDT 2012 cannot find the USMT file for Windows XP because MDT 2012 unpacks the USMT5 files and Windows XP expects USMT3.
Possible solution
You will need to create a USMT3 folder in DeploymentShareToolsX86 and unpack the CAB file into this folder.
- Create a folder called USMT3 in .Deployment Repositorytoolsx86 Note: There is already a directory called USMT5. Verify that you have created a new directory called USMT3.
- Locate the file USMT30_x86.cab. It is located in the Deployment Repositorytoolsx86 directory.
- Extract the cab in the USMT30_x86.cab in the USMT3 folder you created in step 1 (above).
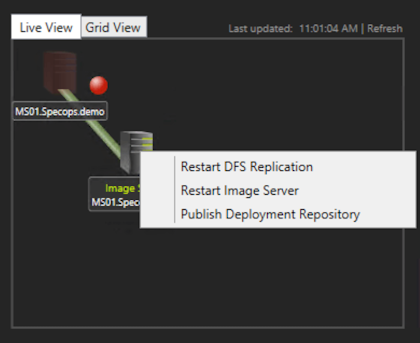
- Publish the deployment repository from the Specops Deploy/OS admin tool.
- Open the Specops Deploy/OS admin tool.
- In the navigation pane, select Servers.
- Right-click on the image server and select Publish Deployment Repository.
“Access is Denied” error when importing an OS from DVD
Possible cause
McAfee Antivirus
Possible solution
Either disable McAfee Antivirus Realtime Protection while you do the import, or setup exclusions of the DVD Drive and Specops Deploy repository folder.
In-place upgrade stalls when switching languages
Possible cause
When performing an in-place Windows 10 upgrade, the installation will stall if the image used is not the same language as is currently installed, e.g. if the installed system language is English, and the image used is Swedish.
Possible solution
Only perform in-place upgrades when the languages match (i.e. English to English, Swedish to Swedish etc.)
Event logging
The Specops Deploy/OS component logs the operations that have been performed to the application log on the appropriate server.
Image Server events
| Event type | ID | Description |
|---|---|---|
| Information | 100 | Image Server started. |
| Information | 101 | Services stopped successfully. |
| Error | 330 | Failed to update the SCP with information about the Image Server status. This event indicates a problem in communicating with the domain. |
Deployment Server events
| Event type | ID | Description |
|---|---|---|
| Information | 101 | Service successfully started. |
| Information | 102 | Services stopped successfully. |
| Information | 103 | Listening to client request on named pipe “SpecopsOsDeploy.” |
| Information | 112 | Install request received from a client computer. This event also contains useful data from the computer. |
| Information | 115 | Initialization is waiting for pre-requisites. |
| Information | 116 | Initialization is completed. |
| Information | 121 | Listening to net.tcp:// |
| Information | 134 | Boot image monitor completed processing updated boot image. |
| Error | 312 | Install request received from a client computer failed to create and return settings. This error typically contains a missing task sequence and is cause when a GPO contains old settings. |
Debug logging
You can configure the components of Specops Deploy/OS to log their internal activity to a verbose debug log. The debug log allows you to follow the events leading up to the error. Debug logging is enabled by changing the relevant registry key from “0” to “1.” Additional logging will be returned by using the higher debug levels “2” or “3.”
| Registry key | Description |
|---|---|
| HKLM\SOFTWARE\Specopssoft\Specops Deploy\Image Server\Debug | Enables or disables debug logging on the Image Server. Default value: 0X00000000 (0) |
| HKLM\SOFTWARE\Specopssoft\Specops Deploy\Deployment Server\Debug | Enables or disables PXE filter debug logging on the Deployment Server. Default value: 0X00000000 (0) |
| HKLM\SOFTWARE\Specopssoft\Specops Deploy\Admin Tools OS\Debug | Enables or disables debug logging of the activity performed by the Specops Deploy/OS Admin tool. Default value: 0X00000000 (0) |
Note
Do not leave the debug logging turned on unless you need it. Verbose logging over an extended amount of time can create large log files which have the potential of filling your system disk partition.