This website uses cookies to ensure you get the best experience on our website. Learn more

Creating a WinPE boot image with Windows 10 Drivers
Table of Contents
Wouldn’t it be nice if you didn’t have to wait for your Windows 7, 8 and/or 8.1 NIC/Storage drivers to be imported into my WinPE Boot image every time you added a NIC driver? The Windows PE boot image in Specops Deploy 6 (the latest version) uses the Windows 10 x86/x64 Kernel, and as such, may require different drivers if you are rolling out Windows 7/8/8.1 to your workstations. By creating a separate selection profile you can avoid bloating your Windows PE image with Win7/8/8.1 drivers that will never be used, and avoid driver conflicts than can stop your boot image from connecting to your deployment server.
The following steps outline how to create a separate Windows PE boot image:
- Open the Deploy OS Admin
- Add new Child folder, and name it WinPE.
- Select Make for the Driver Folder Type.
- Create another new Child folder. Select OS for Driver Folder Type, and select Windows 10 for the Operating System.

- Open the MDT Deployment Workbench and expand Advanced Configuration, Selection Profiles, right click and select New Selection Profile.
- Name it WinPE, and click Next.
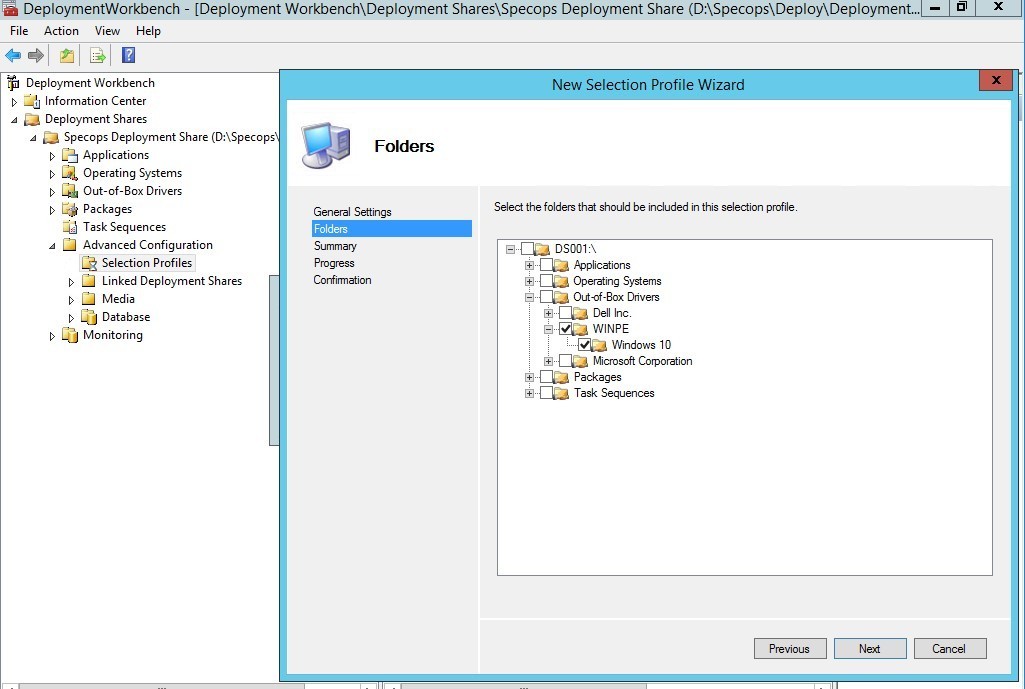
- Under Folders Expand Out-Of-Box Drivers, WINPE, Windows 10 and tick them both.
- Click Next 3 times to complete the creation process.

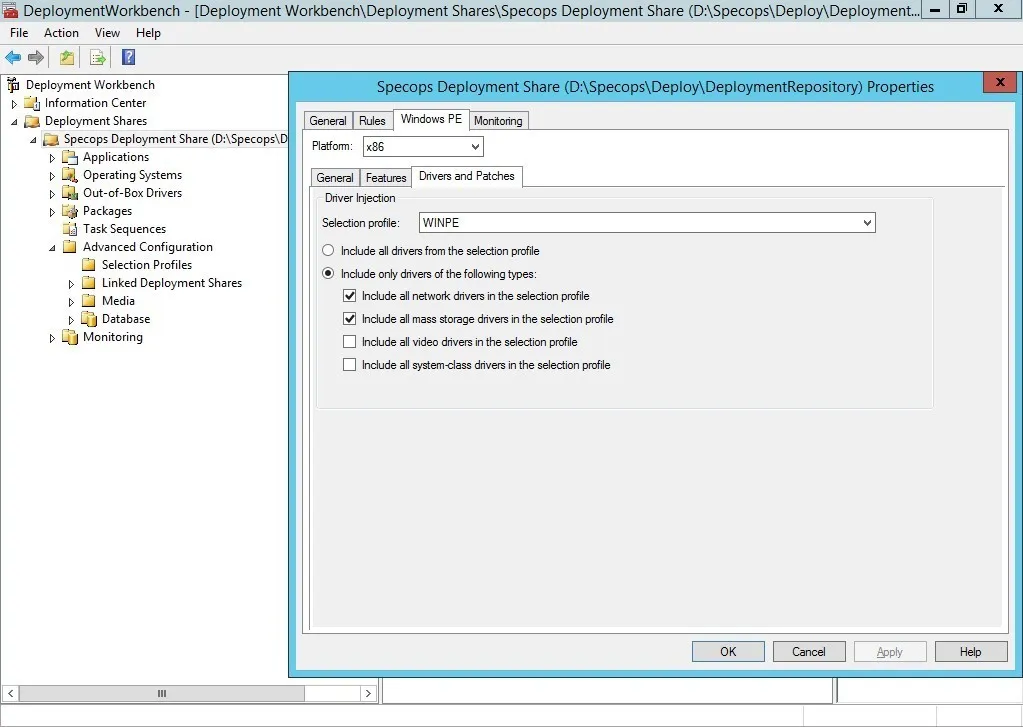
- Right click on Specops Deployment Share and select Properties.
- Click the Windows PE tab, and then the Drivers and Patches tab underneath that.
- Change the Selection Profile to WINPE, and OK.

- Add machine specific network and storage drivers to the Windows PE folder in the Specops console.
- Update the boot image and distribute to deployment servers (allow at least 15 minutes to distribute image to deployment server(s)).
You should do this process for both x86 and x64 boot images and then publish your deployment repository in Deploy.
This is the recommended way the Product Services team here at Specops would like you to set up your Driver Management. We have had great success with our customers using the Windows 10 WinPE while still supporting the older operating systems. It will also reduce the time it makes to publish your deployment repository. If you are going to upgrade to Specops Deploy 6.0, we recommend that you do these steps before your first publish to keep your boot image clean.
Happy Deployments!
(Last updated on October 8, 2024)
